
I've had a handful of comments asking about the collages -- I thought this might be the easiest way to show you how I make my collages. Sometimes, if I know exactly how I want it to look, I use Photoshop Elements (a watered down digi-scrapping friendly version of the full photoshop). But most of the time Picasa works just as well for simple, quick and easy collages.
So download Picasa if you haven't already! It's a free photo editing software by google people, and it's GREAT! Just google 'picasa' and they'll send you to a link.
Once you've got it open and running it'll find the pictures saved on your hard drive. So pick a few of them that you'd like to throw into a collage: click on the picture, then click on the little thumbtack button by the bin at the bottom of the screen (I circled it in the screen shot below). It'll show up in the bin at the bottom left hand corner. Then pick the next picture, 'hold' it with the thumbtack button, etc etc. till you have all the pictures you want for your collage in the bin. (You can also hold down the ctrl key while you click multiple pictures within the same folder, then click the thumbtack to 'hold' them all at once). Then click the collage button (the 2nd red arrow is pointing to it on the screen shot below)
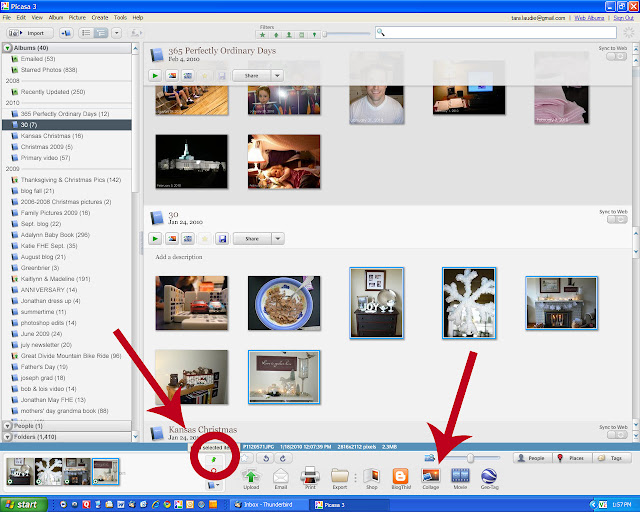
Now picasa puts you in the collage window -- there's lots of fun possibilities to explore in the options bar on the left of the screen - starting with format - a picture pile, a grid, a mosaic, etc. You can rearrange the pictures (at the bottom of the screen below your collage draft is a shuffle pictures button), you can add a grid in the color of your choice, you can do lots of stuff. If you decide you need to edit one of your pictures, click the library tab (circled below), edit the picture that needs it (maybe a recrop to fit the collage space better? Maybe a color adjustment?), then click back to the collage tab (to the right of the library tab). It's pretty straightforward and user friendly. So download Picasa if you haven't already! It's a free photo editing software by google people, and it's GREAT! Just google 'picasa' and they'll send you to a link.
Once you've got it open and running it'll find the pictures saved on your hard drive. So pick a few of them that you'd like to throw into a collage: click on the picture, then click on the little thumbtack button by the bin at the bottom of the screen (I circled it in the screen shot below). It'll show up in the bin at the bottom left hand corner. Then pick the next picture, 'hold' it with the thumbtack button, etc etc. till you have all the pictures you want for your collage in the bin. (You can also hold down the ctrl key while you click multiple pictures within the same folder, then click the thumbtack to 'hold' them all at once). Then click the collage button (the 2nd red arrow is pointing to it on the screen shot below)


And here's the collage (blogged straight from picasa - see the little blogger button in the bottom button bar?? It'll upload 4 pictures at a time for you - it only works with blogger. If you use a different blogging platform, just upload the pic as you usually do - you can copy the full path of the collage by right clicking it in picasa):

Wasn't that easy?! LOVE free picasa goodness!


3 comments:
Look at you doing your own "how to". Great job with screen shots, arrows and everything. Thanks for that!
Wow. I'm now more impressed than ever with what you create. Still not convinced I can do it....
nicely put :o) I don't think there's a better way to explain it! I LOOOOVE Picasa!!
Post a Comment